Table of Contents
Custom Action Mapping
Custom or DLL Mapping to Power Automate Desktop. The following article applies to Custom Activities/Package in UiPath, VBOs in Blueprism, and TaskBots in Automation Anywhere v10/11. All three will be…
This article applies to:
- Custom Activities, Project Libraries, and Method Invocation in UiPath
- Processes & VBOs in Blue Prism
- Custom Packages and Unmapped Actions in Automation Anywhere v10/v11/360
This article assumes familiarity with exporting and importing Rules CSV Mapping sheet. See Common Procedures.
Custom Actions Table Explained
Column | Description |
Enabled | By default Rules are disabled. When disabled a Rule will have no affect on export. When enabled, Rule will be applied where applicable. Best practice is to leave a Rule disabled until it is fully configured. |
Scope | The scope can be either a project or entire Blueprint instance. When using a project as a scope, the rule will apply to all applicable processes within the project. This flexibility allows users to haven different rule sets for different projects. |
Parameters | Where to map Inputs and Outputs. When clicked a modal will appear with a table to map which parameters are inputs and which are outputs. |
Package Name | Also known as namespace, is a container that helps organize activities and avoid naming conflicts. It is used to group related classes, interfaces, and objects. For Method Invocations this is the Target Object |
Action Name | The name of the specific activity within the namespace. For Method Invocations this is the target Method. |
Type | What type of Rule the user wishes to apply: EXTERNAL_FLOW, SUB_FLOW, RUN_ROBINSCRIPT, RUN_VBSCRIPT, RUN_JAVASCRIPT, RUN_POWERSHELLSCRIPT, RUN_PYTHONSCRIPT, RUN_CSHARPDOTNETSCRIPT, RUN_VBDOTNETSCRIPT Each one of these is explained in detail throughout this article |
ID | When using EXTERNAL_FLOW, this is the GUID of the Flow in PAD. Related: How to Find Flow ID |
Name | When using EXTERNAL_FLOW, this is the name of the External (Desktop) Flow to map to. Related: How to Find Flow ID When using SUB_FLOW, this will be the name of the subflow that is generated during export |
Script | When using any of RUN_* Types, a user can enter their script here. Related: Script Mapping |
UiPath to PAD
Mapping Parameters
The first step to any Rule is mapping the parameters. Due to technical limitations Blueprint is unable to always determine whether a parameter is an input or output and therefore has to be mapped by a user. To do so, click on the parameters icon to expose the parameters modal seen below
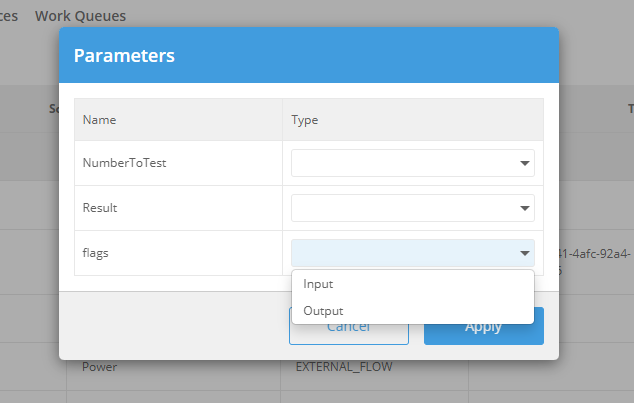
For each parameter indicate which is an input and which is an output. When complete click Apply to finish.
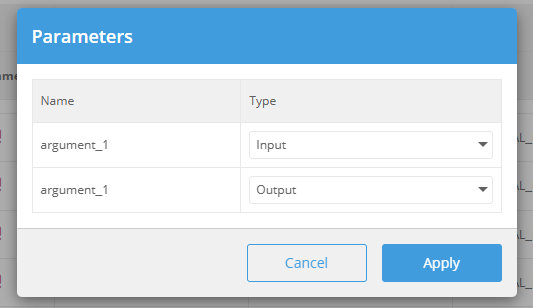
In some instances a parameter will be an input and an output. In those situations the parameter will be listed twice. One instance needs to be set to input and the second to output:
Project Libraries
Project Libraries are UiPath projects repackaged into NuGet packages that can be distributed to other UiPath projects as a dependency. Because these are fundamentally a UiPath project Blueprint is able to export these into PAD. To be able to export these into PAD, ensure that the NuGet package is imported into Blueprint before attempting to export. It's okay to generate Rules before a project library is imported.
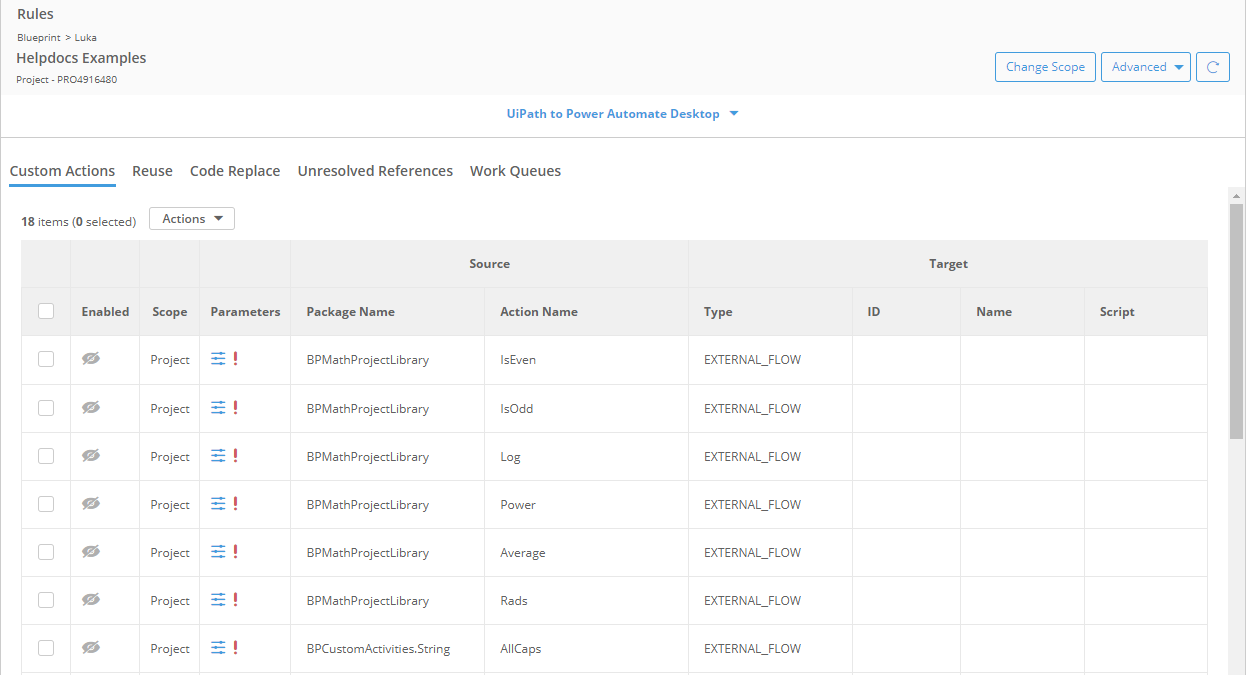
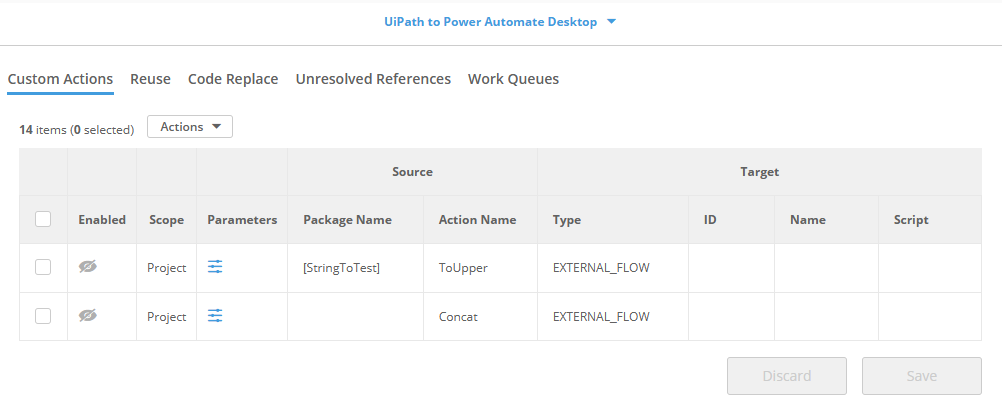
Under the Custom Actions tab in Rule dashboard, Project Libraries will have a Package Name and Action Name. For Example:
Map to New Flow
After initially generating Rules, this is the most common mapping option. To map to a new flow all the user needs to do is enable the Rule(s). After enabling the Rule(s) and exporting, the following happens:
- A reference to <namespace>.<activity>, for example BPMathProjectLibrary.isOdd is found in a process(es) being exported
- The Rules table is checked to see if there any enabled Rules for BPMathProjectLibrary.isOdd
- If a Rule is found, the Rules Engine checks the Type, in this case it is EXTERNAL_FLOW
- If no ID and Name exists, Rules will create a new External Flow.
- Rules engine will look for the project library within the Blueprint instance.
- If found, the logic within the project library activity will be exported into PAD. If not found, a blank flow will be created.
- ID and Name will be populated in the Rules table so that for every subsequent export, Rules will map to this newly created Flow.
Map to Existing Flow
To map to an existing flow, the ID and Name of the flow are required. If Rules generated these in a previous export then no action is required and they should already be populated. If they are not populated reference the following article on how to find an existing flow's Name and ID: How to Find Target Names and IDs in PAD

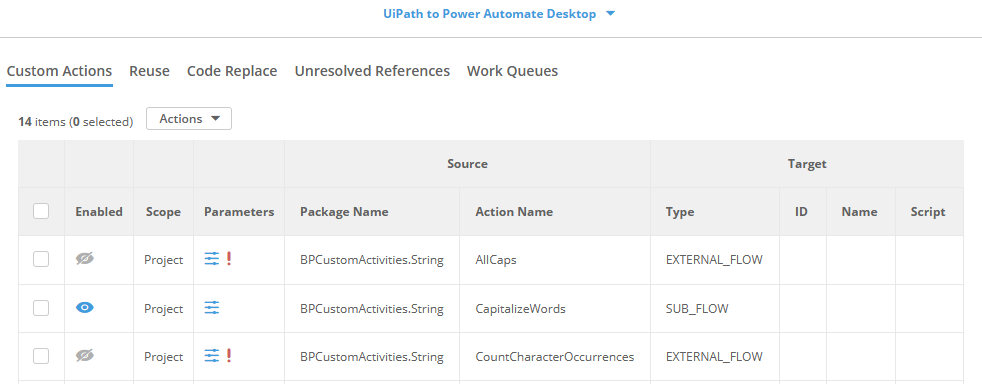
Map to Subflow
Mapping to a subflow is the second most common approach when exporting project libraries. To configure it, set the Type column to SUB_FLOW, then click the edit icon in the ID column to open a modal where you can select an existing subflow. (Note: The target subflow must already exist in Blueprint before you can map to it.)
Map to Script
When mapping to a script the user is replacing the project library with new logic that is written in any of the available scripting languages. The most common is mapping directly to Robin Script, which is the underlining scripting language behind Power Automate Desktop. See Script Mapping for more detail.
Advanced: Map to Different Versions
In some scenarios, project libraries are regularly updated and use version ranges. For example, a project may reference BPMathProjectLibrary v1.0.9 while the latest version is 1.0.10. Rules however, uses strict version mapping when looking for project libraries. Therefore, in scenarios where there are ranges, in addition to mapping namespace and action, the user needs to also map the versions. To do so
The following columns will be already filled in by Rules generation
- Column A ("ScopeId") = Scope for Rule. Blank implies Instance level
- Column B ("SourceActionType") = CUSTOM_ACTION
- Column C ("TargetActionType") = EXTERNAL_FLOW or SUB_FLOW
- Column E ("SourceObjectName") = Project Library Namespace
- Column G ("SourceActionName")= Project Library Method Name
- Column N ("SourceParameterName") = Name of Parameter
- Column R ("TargetParameterName") = Same as SourceParameterName
- Column Y ("IsActive") = FALSE
The following needs to be completed by the user
- Column O ("SourceParameterType") = Input or Output
- Column V ("SourceVersion") = The version of the project library that is imported in Blueprint
- Column W ("TargetVersion") = The version of the project library that is referenced in the calling UiPath project
- Column Y ("IsActive") = TRUE
Custom Activities And Method Invocations
Custom Activities are C# projects using the Custom Activity template from UiPath. These activities compile into a NuGet package that is composed of DLL files that UiPath is able to parse and expose activities in Studio. Because these are compiled code Blueprint is unable to convert them directly to flows in PAD.
Method Invocations
For Method Invocations that use a target object the Package Name will be the object variable in square brackets and for target type invocation, the Package Name will be empty.
For following options are available for both of these Rule types:
Map to New Flow
Unlike Project Libraries, the code within a Custom Activity cannot be extracted and imported into Blueprint. Therefore, when choosing to create a new flow the flow will not contain any business logic, it will be an empty flow that the user will need to fill in later. After the first export, the new flow's ID and Name will be populated in the Rules table so that for every subsequent export, Rules will map to this newly created Flow.
Map to Existing Flow
To map to an existing flow, the ID and Name of the flow are required. If Rules generated these in a previous export then no action is required and they should already be populated. If they are not populated reference the following article on how to find an existing flow's Name and ID: How to Find Target Names and IDs in PAD
Map to Script
When mapping to a script the user is replacing the custom activity with new logic that is written in any of the available scripting languages. The most common is mapping directly to Robin Script, which is the underlining scripting language behind Power Automate Desktop. See Script Mapping for more detail.
Map to Subflow
Because Custom Activities have no business logic Blueprint is unable to migrate these as subflows.
Blue Prism to PAD
Missing Process or VBOs is fairly rare when working with Blueprism bot estates. Typically bprelease files contain all needed dependencies and most pre-packaged VBOs are supported. However, in the rare occasion that a dependency is missing Blueprism users can use Unmapped Activities to map these activities.
Automation Anywhere v10/v11/360
Custom packages and unsupported packages are considered unmapped activities. See Unmapped Activities to learn how to map these.
How did we do?
Using the Rules Wizard
Reuse Mapping to Power Automate Desktop