Home & Global Resources
Blueprint Assess
Blueprint Migrate
Getting Started
The Blueprint User Interface
Change Your Password
Open a Project
Organize Artifacts and Assets
Close a Project
Status Indicators
Jobs
Exporting from Source RPA Tools
How to export a UiPath Automation Project from UiPath Orchestrator
How to export .bprelease files from Blue Prism
Blue Prism VBO Matching on Import
How to Export .zip files from Automation A360 Control Room
Importing
Exporting
RPA Export from Blueprint
Variable Prefixing
Why We Create Multiple Similar Subflows During Migration
Understanding Wrapper Flows in Power Automate Desktop
Setting up defaultRunDotNetScriptReferences
AsEnumerable Support
XmlDocument Support
Bulk Reimport/Recalculate
Metabot Migration - Best Practices
Artifacts Management
Base Artifact Types
Creating and Managing Artifacts
View and Edit Artifacts in the Utility Panel
Concurrent User Activity in Artifacts (Steal Lock)
Using Descendants View
Global Actions
Rules
Rules Overview
Rule Pre-Requisites
Using Rules
Rules User Interfaces
Using the Rules Table
Using Rules CSV
Using the Rules Wizard
Custom Action Mapping
Reuse Mapping to Power Automate Desktop
Manual Reuse
TODO, Error, and Robin Mapping
Script Mapping
Variable Name Dependency Mapping
Variable Renaming and Initialization
DLL/Method Invocation Mapping
Unresolved References
Work Queues Mapping
Solutions & Best Practices
Working with Migration Output in Power Automate Desktop (PAD)
Blueprism to PAD Migration Output Details
UiPath to PAD Migration Output Details
A360 to PAD Migration Output Details
RPA Value-Mapping Assessments
Why Choose Blueprint Cloud vs. On Premise ?
Setting up SAP for RPA
UiPath Conversion of "Sharepoint Scope and Get File"
API & Developer Resources
REST API Request Header and Parameters
REST API Request Body and Parameters
REST API - Listing Artifacts in the Request Body
REST API - Defining an Artifact in the Request Body
REST API - Defining a Comment in the Request Body
REST API - Defining a Reply in the Request Body
REST API - Defining a Trace in the Request Body
REST API - Filter Parameter
REST API - Defining a User in the Request Body
REST API Requests
REST API - Add Attachment to Subartifact Request
REST API - Get Artifact Request
REST API - Add Traces Request
REST API - Get Project by Id Request
REST API - Update Custom Choice-Property Type Request
REST API - Publish Comments Request
REST API - Publish Artifact Request
REST API - Update Comment Request
REST API - Delete User Request
REST API - Add Comment Request
REST API - Close Review Request
REST API - Get Discussion Status Request
REST API - Update Reply Request
REST API - Get Attachment Request
REST API - Delete Comment Request
REST API - Create Project Request
REST API - Get Group Request
REST API - Rate Comment Request
REST API - Get Child Artifacts of Artifact Request
REST API - Discard Artifacts Request
REST API - List Artifacts Request
REST API - Rate Reply Request
REST API - Move Artifact Request
REST API - Delete Attachment Request
REST API - List Projects Request
REST API - Get Blueprint Product Version Request
REST API - Update Standard Choice Property Request
REST API - Get Review Request
REST API - Reply to Comment Request
REST API - Update User Request
REST API - Get Collection Request
REST API - Delete Artifact Request
REST API - List Collections Request
REST API - Authenticate Request
REST API - Get Artifact Type Request
REST API - List Artifact Types Request
REST API - Delete Reply Request
REST API - Get Root Artifacts of Project Request
REST API - Add Attachment Request
REST API - Create User Request
REST API - List Reviews Request
REST API - List Groups Request
REST API - Get User Request
REST API - Delete Traces Request
REST API - Add Artifact Request
REST API - List Users Request
REST API - Get Artifact Image Request
REST API - Update Artifacts Request
REST API - List Unpublished Artifacts Request
REST API HTTP Methods
REST API - HTTP HEAD Method
REST API - HTTP DELETE Method
REST API - HTTP GET Method
REST API - HTTP POST Method
REST API HTTP Status Codes
REST API - HTTP PATCH Method
Blueprint REST API
REST API Quick Start Example
REST API Requests and Responses
REST API Security and Authentication
REST API Known Issues & Constraints
REST API Requests
REST API Resources
REST API - Defining an ALM Job in the Request Body
Dashboards & Reports
Statistics Report Options
Using Scope and View
Statistics Dashboard
Statistics Reports
Applications Dashboard
Applications Report
Estimator Dashboard
Estimator Reports
How to Change the Main Process Label for Estimations
Bulk Reporting
Call Trees
Blueprint + PowerBI Dashboards
How to Create Microsoft Power Automate RPA Migration Estimates with Blueprint
Licensing
Settings & Administration
Overview of Blueprint Settings
System Reports
System Reports
License and Activity Reporting
User List
Project Activity
User Roles
Artifact Map
Project Usage
User Activity Report
Audit Log
System Logs
User Management
Creating and Managing Users
Creating and Managing Groups
Creating and Managing Instance Administrator Roles
Creating and Managing Project Administrator Roles
RPA Management
Microsoft 365 Authentication Settings
Integration Reporting
Migrate - Import/Export
Migrate - Dashboards
Migrate
Analyze
Automation360 Authentication Settings
GenAI
Advanced Settings
Projects
Installation
Blueprint Installation Guide
System Requirements
Supported Third-Party Components
Azure App Registration (Power Automate Export)
Release Notes
Table of Contents
- All Categories
- Blueprint Migrate
- Artifacts Management
- Creating and Managing Artifacts
Creating and Managing Artifacts
Creating a New Artifact. You can create artifacts in any project you have access to. The Create Artifact window will display all available artifact types for that project. To create a new artifact: S…

Creating a New Artifact
You can create artifacts in any project you have access to. The Create Artifact window will display all available artifact types for that project.
To create a new artifact:
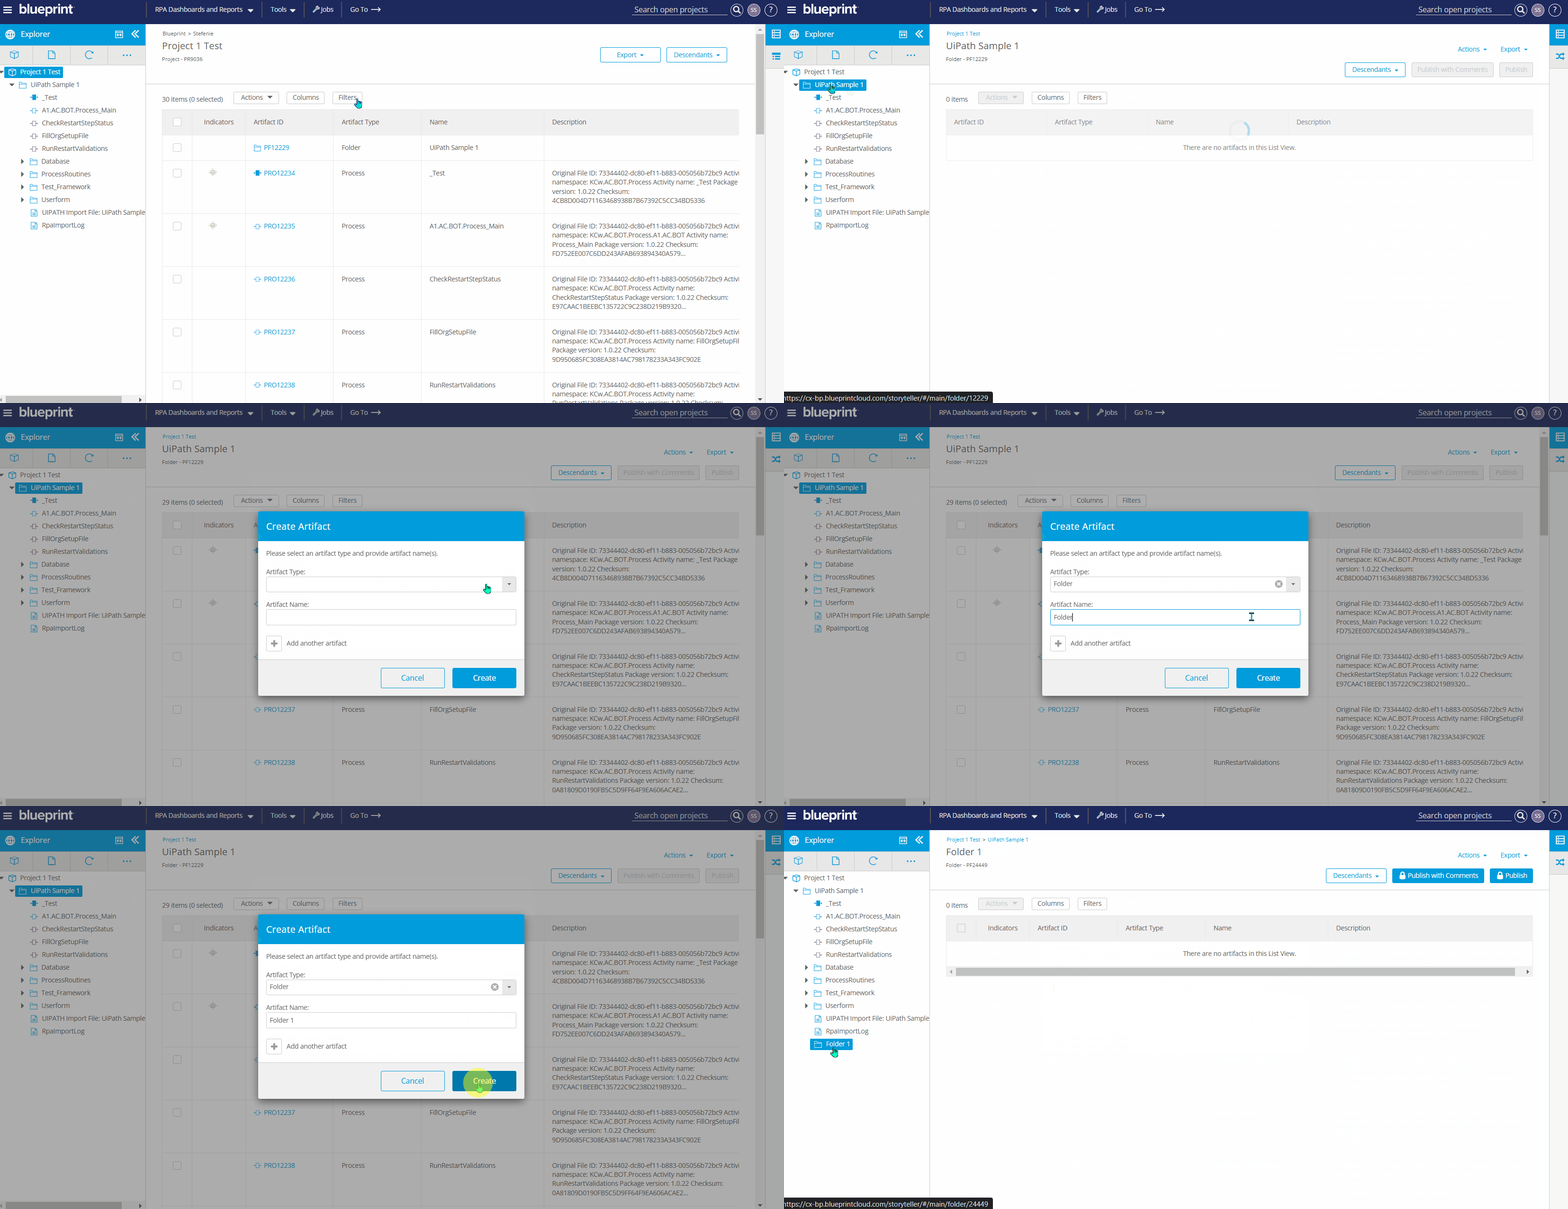
- Select the folder, artifact, or project you want the new artifact to be added to.
- Click the New icon (
 ) in the main toolbar.
 - In the Create Artifact window displayed, select the artifact type and name the artifact. You can create multiple artifacts of the same type, at the same time, by clicking Add another artifact and entering their artifact names as needed.
- Click Create. The new artifact is loaded into the main content area.
Artifacts can be rearranged after they are created and your project can be organized in any way.

Saving and Publishing Artifacts
When you create new, or edit existing artifacts, saving your changes creates "private drafts" on the central server that are not visible to other users until you publish them.
An artifact with unsaved changes is indicated with active Publish buttons with a lock icon on the top right corner of the page. You may Publish with Comments or simply Publish the changes to the artifact. To publish an artifact, click the applicable Publish button in the artifact toolbar.

Publishing an artifact makes your changes to an artifact available and visible to other users. Users always see the last published version after opening an artifact.
You can also use the Publish All button from the More dropdown in Explorer Panel to publish all unsaved changes to every artifact across your project.
Searching for Artifacts
There are different ways to search for artifacts depending on the information you have available.
Searching with the Artifact ID
When you know the artifact ID of the artifact you want to access:
- Click the Go To feature (
 ) in the main header and enter the artifact ID for the artifact you want to access, and then press Enter.
 - The artifact you searched for is displayed in the main content area.
Searching with the Artifact Name
When you are not sure of the artifact ID for the artifact you want to access:
- Enter the artifact name or a keyword from the artifact name in the Search Open Projects field in the main header and then press Enter.
- Blueprint queries all the projects you have open in the Explorer. Click the artifact ID link in the Search Results modal to display the artifact you were searching for in the main content area.
Moving Artifacts
Moving Artifacts via Drag and Drop
In Blueprint, you can select single or multiple artifacts and drag and drop them within your workspace, supporting optimal planning and work management for large sets of data.
The ability to drag and drop artifacts also allows you to quickly and easily organize your repository to reflect your business context.
When dragging and dropping artifacts, hierarchies are maintained where possible. For example:
- When an artifact is selected and dragged, its child artifacts will come with it and hierarchies will be respected when dropped.
- When artifact A is dropped into artifact B, it becomes a child of that artifact. When artifact A is dropped above artifact B, they become sibling artifacts.
- Dragging and dropping artifacts is only supported in the Chrome browser
- A user must have edit privileges in a project in order to move artifacts in that project
- Folder artifacts cannot be moved into a location in the explorer that is not a folder
- Artifacts cannot be moved across projects via drag and drop in the Explorer
- A maximum of 500 artifacts can be moved at one time
Moving Artifacts via Blueprint Menu
Artifacts can also be moved in your project using the Move Artifact button in the artifact toolbar.
To move an artifact with the Move Artifact feature:
- Select the artifact you want to move in the Explorer.
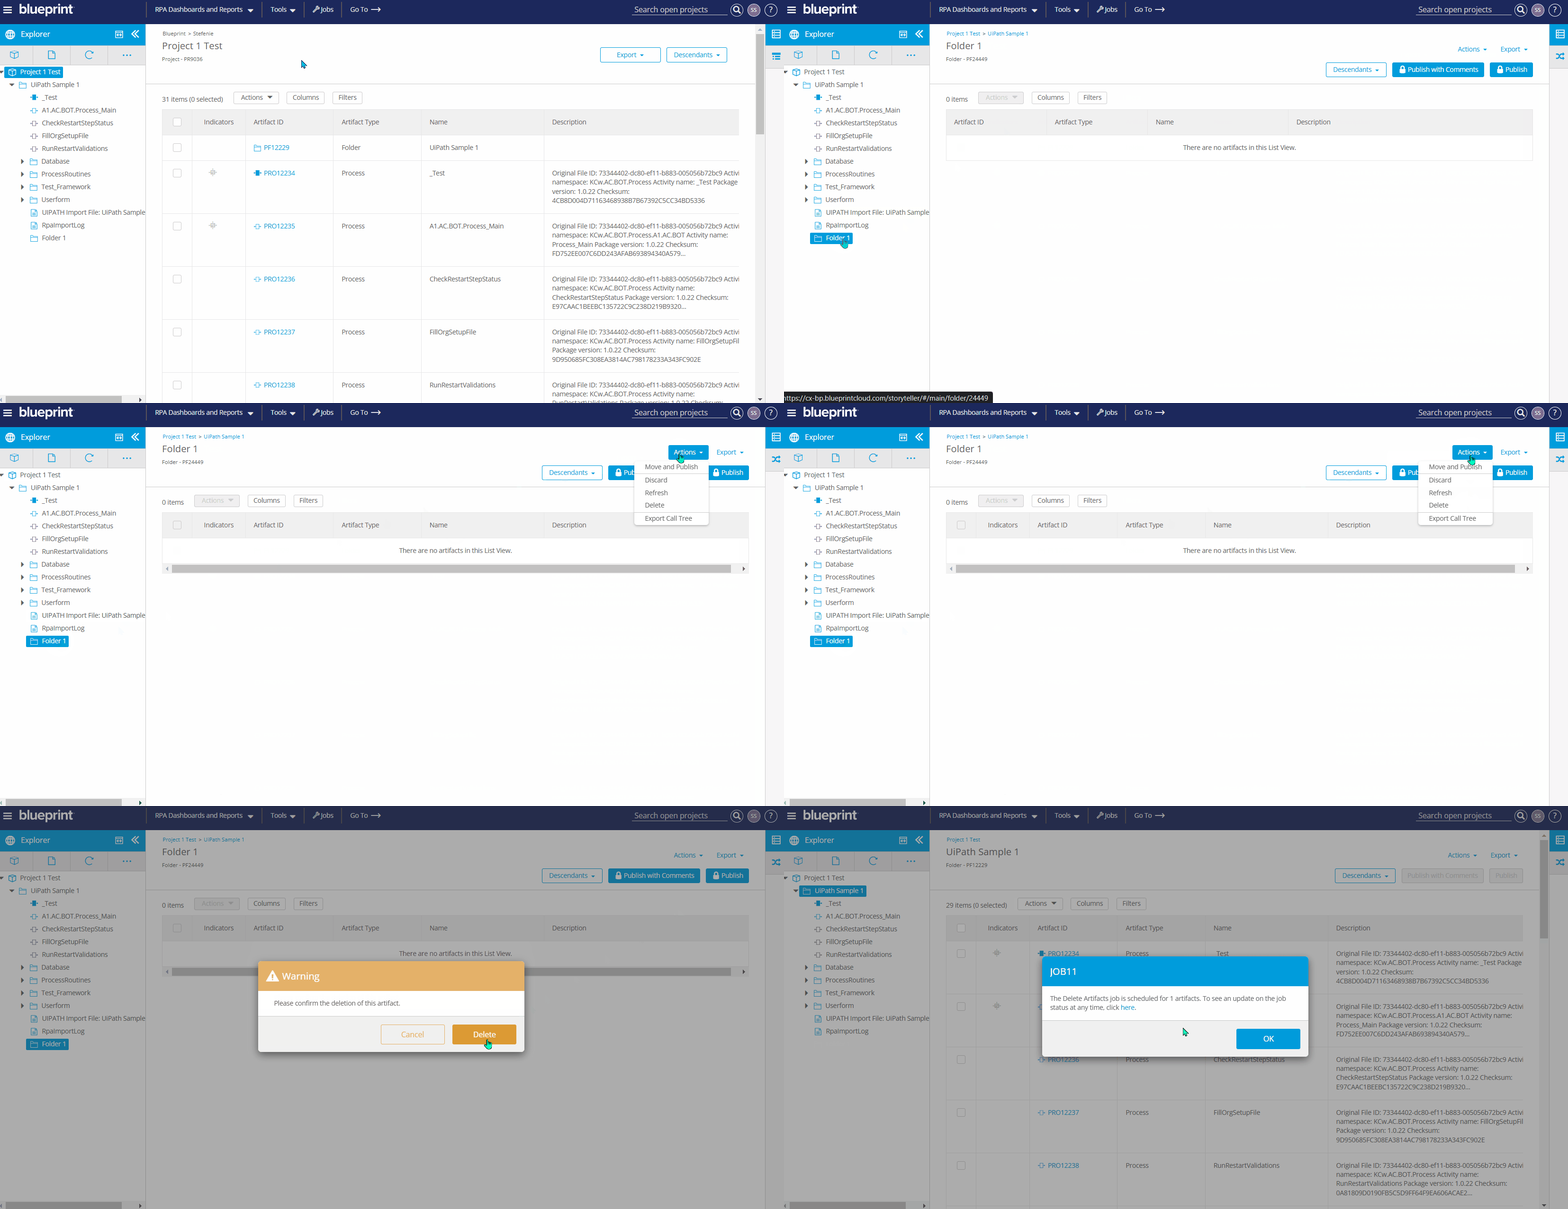
- Click on Actions drop-down menu, and select Move and Publish
- In the Move to... modal displayed, navigate to where you want the artifact to be copied.
- If the destination is within the same project, find the exact location within the hierarchy.
- If you want the destination to be another project, and the artifact is a standard type, click the "back" indicator next to the root of the current project to display all projects in the instance that you have access to. Then, find the exact location within the hierarchy.
- Choose if you would like to insert the artifact Inside, Above, or Below another artifact.
- Use the search box or browse the project hierarchy to find the appropriate location.
- Click Move and Publish. The artifact will be moved to your chosen location and will be in a published state.
Trace relationships, attachments, comments, document references, artifact history, and custom properties are all preserved when moving an artifact. The descendants of the artifact will be moved with the parent artifact by default.
- Any artifact that is locked by other users or is not yet published cannot be moved to another project. Any artifact can be a parent of another artifact, but a folder can’t have a parent that isn’t a folder.
- To move artifacts to a new project, users must have edit permissions for the artifacts to be moved as well as edit permissions for the parent artifacts in the target location.
Discard and Delete Artifacts
Discarding changes you've made (no matter how many times you have saved them), reverts the artifact back to the last published version.
- To Discard changes to an artifact, click the Discard option under the Actions Button on the top right corner of the page.
- To Delete an artifact, click the Delete option on under the Actions Button on the top right corner of the page.

How did we do?
Base Artifact Types
View and Edit Artifacts in the Utility Panel
